Category: Race Car Builds & Projects

  • How to Document and Plan Your Race Build

    How to Document and Plan Your Race Build

    How to Document and Plan Your Race Build

    Building a race car is not just about assembling parts; it involves meticulous planning and thorough documentation to ensure that every component works in harmony. A well-structured project begins with a clear roadmap that guides you through the various stages of the build process. This helps in identifying potential challenges early and allows for adjustments before they become costly mistakes.

    To effectively document and plan your race build, start by outlining your project’s goals and objectives. Understanding what you want to achieve with your build will help you make informed decisions throughout the process. Whether you’re aiming for speed, performance, or reliability, having specific targets in mind will serve as the cornerstone of your planning.

    Next, break down the build into manageable tasks. This involves creating a timeline and assigning deadlines to each phase of the project. By segmenting the build process, you not only make it less overwhelming but also allow for better tracking and resource allocation. Keeping detailed records of each step taken will enhance both your project management skills and the quality of the final product.

    Identifying Goals and Objectives for Your Race Build

    Identifying Goals and Objectives for Your Race Build

    Establishing clear goals and objectives is essential for the success of any race build project. Begin by defining what you want to achieve. This could range from improving your lap times to enhancing overall vehicle performance. Break down your overarching goal into specific, measurable objectives that guide your planning process.

    For instance, if your primary goal is to increase speed, consider objectives such as reducing vehicle weight, optimizing aerodynamics, and upgrading the engine. Each objective should be actionable, allowing for effective tracking of progress through a project log, where you can record your milestones and modifications made during the build.

    Additionally, consider the timeframe for your race build. Establish deadlines for each objective to ensure timely completion. When you allocate time for specific tasks, you enable yourself to stay focused and accountable, which enhances the organization of your planning efforts.

    Furthermore, involve stakeholders or team members in the goal-setting process. Their insights might help clarify objectives and uncover aspects you hadn’t considered. Collaboration fosters a sense of ownership and commitment, which can drive motivation throughout the build.

    Lastly, regularly review and adjust your goals as needed. A project log can be beneficial in documenting these reviews, helping you reflect on what is working and what requires modification. This adaptability will ensure that your race build aligns with your evolving needs and aspirations.

    Creating a Structured Build Log for Tracking Progress

    Developing a structured build log is essential for effectively tracking progress throughout your race project. A well-organized log serves as a central repository for all relevant information, helping maintain clarity and focus during the planning and execution phases.

    1. Define Key Sections: Begin your build log by identifying essential sections that will serve your project’s needs. Common sections include Objectives, Materials Used, Work Procedures, Timeline, and Performance Testing. Each section should cater to different facets of your build, allowing for comprehensive tracking.

    2. Document Objectives: Clearly outline the goals of your race build at the start of your log. This section should include specific targets such as weight limits, speed requirements, and safety considerations. Having well-defined objectives will provide a benchmark for measuring your progress.

    3. Record Materials and Resources: Keep a detailed inventory of materials, tools, and resources utilized throughout the project. Tracking this information not only aids in planning future builds but also helps you understand how different materials affect performance and cost efficiency.

    4. Log Work Procedures: Document each step of the process in chronological order. This will not only provide a clear history of what was done but also serve as a reference for troubleshooting issues or optimizing future builds. Note down challenges faced and how they were resolved.

    5. Establish a Timeline: Integrate a timeline that includes key milestones and deadlines for your project. A visual representation of your timeline can help to keep the project on track and ensure timely completion.

    6. Performance Testing and Evaluation: After completing your build, record the results of performance testing. Documenting the outcomes will allow for critical evaluations and adjustments. Compare the actual results against your initial objectives to gauge success and identify areas for improvement.

    A structured build log is a vital component of effective project planning and implementation. By consistently updating and referring to your log throughout the race build, you will enhance your ability to monitor progress and achieve your racing goals.

    Reviewing and Adjusting Your Plan Based on Performance Data

    Reviewing and Adjusting Your Plan Based on Performance Data

    In any successful project, especially in race build planning, it is essential to regularly review and adjust your strategies based on performance data. This approach allows you to identify strengths and weaknesses in your build, ensuring that each component contributes effectively to your overall objective.

    Start by collecting data from various sources, such as timing systems, heart rate monitors, and lap analysis tools. This information provides insights into how well the current build is working. Look for trends in speed, consistency, and endurance. Use this data to pinpoint areas that require improvement, such as pacing strategy or equipment choices.

    Once you have analyzed the performance data, compare it against your initial goals and benchmarks. Assess whether the build is meeting expectations or if adjustments are necessary. For instance, if you find that certain aspects of your performance are lacking, consider revisiting your training regimen or fine-tuning your equipment setup.

    Adjustments can also involve reallocating resources and time. If certain training methods yield better results, modify your planning to emphasize those techniques. This might mean adjusting your weekly schedule or even altering the focus of your workouts. Remember that flexibility is key in any successful project.

    It’s also vital to implement a feedback loop. Gather input from coaches, fellow racers, or performance analysts to gain a more comprehensive understanding of your progress. This collaboration can uncover insights that you may have overlooked, allowing for a more refined adjustment process.

    Finally, document all changes made to your plan. Keeping a detailed record of adjustments and their outcomes can be invaluable for future race builds. This documentation not only aids in tracking progress but also serves as a reference for future planning, ensuring that you continue to grow and improve with each project.

  • Choosing the Right Welding Equipment for Fabrication

    Choosing the Right Welding Equipment for Fabrication

    Choosing the Right Welding Equipment for Fabrication

    Welding is a crucial process in the fabrication industry, with the right equipment playing a vital role in achieving high-quality results. Selecting the appropriate welder is not just about power and performance; it also involves understanding the specific requirements of your projects. One of the first steps in this selection process is to consider the type of welding content you will be working on, including materials like steel, aluminum, and other alloys.

    When assessing your needs, think about the size and complexity of the operations you intend to perform. Mods can enhance the functionality of your welding setup, allowing for customization that can improve efficiency and adaptability. For instance, specialized mods can help tailor the equipment to fit specific chassis types, ensuring that precision and durability are maintained.

    Moreover, the choice of welder type–whether MIG, TIG, or Stick–will greatly influence the outcome of your fabrication. Each method has its strengths and weaknesses, so it’s essential to evaluate them in relation to your intended projects. Investing time in understanding these factors will not only enhance your welding skills but also ensure that your projects are executed with the highest standards of quality and integrity.

    Understanding the Key Specifications of MIG Welders for Auto Fabrication

    Understanding the Key Specifications of MIG Welders for Auto Fabrication

    MIG welders, or Metal Inert Gas welders, are essential tools for auto fabrication, particularly when working on chassis modifications and repairs. Understanding the specifications of these welders is crucial for selecting the right machine that meets your specific needs.

    Welding Amperage is a fundamental specification to consider. MIG welders typically range from 130 to 300 amps. For auto fabrication, especially when welding thicker materials or chassis components, a machine with higher amperage capacity is advisable. This allows for deeper penetration and a stronger weld.

    Duty Cycle is another critical factor. This represents the amount of time a welder can operate continuously without overheating. Measured as a percentage over a 10-minute period, a welder with a higher duty cycle is suitable for larger projects that demand extended use, such as extensive chassis work.

    The Wire Feed Speed is also significant. This determines how quickly the welding wire is fed into the welding arc. Different materials and thicknesses require different feed speeds. For auto fabrication, being able to adjust the wire feed speed ensures better control and efficiency during the welding process.

    Voltage Settings influence the heat input and penetration during the welding process. A MIG welder with adjustable voltage settings provides versatility for various materials and thicknesses, which is vital when working with the diverse components of a vehicle chassis.

    Lastly, consider the Cooling System of the welder. MIG welders can be equipped with either air-cooled or water-cooled systems. Water-cooled systems generally provide better performance during prolonged welding sessions, making them suitable for heavy-duty auto fabrication work.

    By understanding these key specifications, fabricators can make informed decisions when choosing a MIG welder that fits their auto fabrication projects and ensures optimal results.

    Identifying Essential Accessories for Enhancing MIG Welding Performance

    Identifying Essential Accessories for Enhancing MIG Welding Performance

    When it comes to MIG welding, the right accessories can significantly improve your overall performance and results. Understanding what mods to incorporate can make a substantial difference in both quality and efficiency.

    Chassis Components play a crucial role in facilitating your welding process. A robust and adjustable chassis can enhance stability and maneuverability, allowing for more precise welding. Investing in a high-quality welding cart can also help organize your equipment and ensure that everything is easily accessible during fabrication.

    Another essential accessory is a welding helmet equipped with an auto-darkening feature. This allows you to maintain visibility without compromising safety. Look for helmets with adjustable settings to enhance usability across different welding tasks.

    Wire Feeders are another important consideration. Upgrading to an advanced wire feeder minimizes feeding issues, ensuring a smooth weld. A dual-drive system is particularly beneficial, as it helps maintain consistent wire speed, reducing the chances of erratic feeding.

    Additionally, selecting the right welding nozzles can significantly improve gas coverage. Using the appropriate size and style of nozzle ensures a better shielding gas flow, enhancing the weld quality and preventing contamination.

    Finally, consider using a chassis-mounted spool gun for tackling aluminum welding. This accessory allows for a more controlled feed and reduces the chances of wire jamming, providing a seamless experience when working with softer metals.

    In conclusion, by integrating these essential accessories tailored for MIG welding, you can optimize your results, enhance efficiency, and ensure professional-grade welds in your fabrication projects.

    Evaluating Your Project Needs to Select Appropriate Chassis Modification Tools

    When undertaking a chassis modification project, selecting the right tools is crucial for achieving optimal results. Understanding your project requirements will help you determine which tools will best suit your needs.

    Firstly, analyze the specific modifications you intend to perform on the chassis. Consider the following aspects:

    • Material Type: Identify the materials used in the chassis. Common materials include steel, aluminum, and composite materials. Each material requires different welding techniques and equipment.
    • Thickness of Material: The thickness will influence the power requirements for your mig welder. Thicker materials necessitate a more powerful welder with higher output to ensure proper penetration and adhesion.
    • Project Complexity: Assess the complexity of the modifications. Simple fixes may only require basic tools, but intricate modifications could necessitate advanced equipment and technology.

    Once you have a clear understanding of your project scope, you can begin to evaluate the appropriate chassis modification tools, including welders:

    1. MIG Welder: A MIG (Metal Inert Gas) welder is an excellent choice for chassis modifications due to its versatility and ease of use. It works well with various materials and thicknesses, making it suitable for most fabrication tasks.
    2. Tig Welder: For more precise and clean welds, especially on thinner materials, a TIG (Tungsten Inert Gas) welder can be beneficial. However, it requires more skill and practice.
    3. Spot Welder: If your chassis modifications involve joining two overlapping sheets, a spot welder might be the right tool for quick and strong connections.
    4. Plasma Cutter: For cutting metal accurately, a plasma cutter can complement your welding equipment by providing clean cuts on various thicknesses.

    Finally, consider your experience level and the resources available. Choose tools that you feel comfortable with and ensure that you have the necessary protective gear for safety during the modification process.

    By carefully evaluating your project needs, you can make informed decisions on the most suitable tools for chassis modification, thereby improving both efficiency and quality of your work.

  • Top Mistakes to Avoid in Your First Build

    Top Mistakes to Avoid in Your First Build

    Top Mistakes to Avoid in Your First Build

    Entering the world of DIY projects can often feel like a race against time, where the excitement of building something new may drive you to hasten through the prep process. However, skipping crucial steps or overlooking details can lead to common errors that may turn a dream build into a frustrating experience. Understanding these pitfalls and taking preventative measures will not only enhance the quality of your project but will also save you time and resources in the long run.

    As you embark on your first build, it’s important to brace yourself for the reality that mistakes are a natural part of the learning curve. Whether it’s miscalculating measurements, choosing the wrong materials, or neglecting to follow safety guidelines, these errors can derail your progress and diminish your confidence. The key to a successful build lies in thorough preparation – dedicating time to plan, research, and double-check every aspect of your project can make all the difference.

    Throughout this article, we will explore some of the most common mistakes encountered by beginners. By identifying these pitfalls and arming yourself with knowledge, you will be better prepared to tackle your first build with enthusiasm and precision, ensuring a rewarding and successful experience.

    Choosing the Right Components to Avoid Compatibility Issues

    For a beginner, selecting the right components for your first build is crucial to prevent compatibility issues that can lead to frustration and unnecessary errors. A thorough prep phase is essential to ensure all parts work harmoniously together.

    Start by choosing a motherboard that supports your desired CPU. Pay attention to the socket type and chipset compatibility. Ensuring that your CPU will fit into the motherboard is the first step in avoiding conflicts.

    Next, consider RAM. Not all motherboards support every type or speed of memory. Check the specifications of your motherboard to determine the maximum RAM capacity and the types supported. Selecting RAM that is compatible in terms of both speed and type will help mitigate potential performance issues down the line.

    Graphics cards are another area where compatibility must be considered. Verify that your power supply unit (PSU) has adequate wattage and necessary connectors for the chosen GPU. Also, ensure that the motherboard has the appropriate PCIe slots for installation.

    Don’t overlook storage solutions. If you’re considering a solid-state drive (SSD), confirm the motherboard supports the necessary connection interface, such as SATA or NVMe. Furthermore, ensure that there is enough physical space in your case for your storage devices.

    During your prep, researching compatibility lists provided by manufacturers can be invaluable. Many manufacturers publish lists of compatible components, which can guide your selections and help you avoid errors.

    Finally, always double-check the form factor of all components. Ensure your case can accommodate the size of your motherboard (ATX, Micro-ATX, etc.) and GPU. A mismatch here can lead to a frustrating and costly experience.

    By focusing on these key components and thoroughly researching compatibility, you’ll be better equipped to avoid common errors in your first build, paving the way for a successful and rewarding construction experience.

    Understanding Setup and Configuration to Enhance Performance

    Understanding Setup and Configuration to Enhance Performance

    To achieve optimal performance in your first build, a solid understanding of setup and configuration is crucial. Just as a racer prepares their vehicle for the track, you need to prep your system properly to avoid common errors that can hinder performance.

    The first step in your configuration should focus on hardware compatibility. Ensuring that all components, such as the CPU, GPU, and RAM, work together seamlessly is essential. Mismatched parts can lead to bottlenecks and reduced efficiency, similar to how an uncalibrated engine can affect a race car’s speed. Always check manufacturer guidelines and compatibility lists to prevent these issues.

    Once your hardware is set, attention should shift to software setup. Installing the right operating system and drivers is as important as tuning a vehicle’s performance settings. Consider using a clean installation to reduce potential conflicts and errors caused by outdated or unnecessary software. Keeping your drivers up to date will also ensure that you are utilizing the latest optimizations available.

    After the initial setup, delve into performance settings specific to your hardware. For example, adjusting BIOS settings can lead to significant improvements. Enabling features like XMP for RAM can enhance memory speed, much like fine-tuning a car’s suspension for better handling on the track. Be cautious, though, and understand each setting, as improper adjustments could do more harm than good.

    Additionally, monitor your system’s performance once you’ve finished setting up. Utilizing benchmarking tools and stress tests can help you identify potential performance errors. This will allow you to make informed decisions on further configurations, akin to a race team analyzing data post-race to refine their strategy for better outcomes.

    In summary, comprehending the setup and configuration of your first build is vital for enhancing performance. By addressing hardware compatibility, optimizing software setup, fine-tuning performance settings, and monitoring results, you can significantly reduce the likelihood of errors and ensure your system runs as smoothly as possible, ready to take on any challenge you throw its way.

    Pre-Race Checks and Common Oversights Before Competition

    Pre-Race Checks and Common Oversights Before Competition

    Preparing for a race requires meticulous attention to detail, as common errors can derail even the best-prepared athletes. Conducting thorough pre-race checks is pivotal to ensure optimal performance and safety. Start by reviewing gear and equipment; this includes inspecting the race apparel, shoes, and any specialized gear. Ensure everything fits well and is in good condition, as discomfort can significantly impact performance.

    Another key aspect of race prep is dietary considerations. Many athletes make the mistake of altering their nutrition too close to the event. Stick to familiar meals that have proven effective in past performances. Hydration is equally important; it’s essential to assess fluid intake sufficiently in advance to avoid last-minute adjustments.

    Incorporating a mental checklist can also mitigate errors. Visualizing the race course and strategizing pacing can help in alleviating pre-race nerves. Don’t forget to check for any necessary registration documents or race-day essentials like timing chips and identification. These oversights can lead to unnecessary stress on race day.

    Finally, ensure you arrive at the venue with ample time. Rushing can lead to crucial mistakes, from missing warm-up routines to forgetting equipment. Allowing time for unforeseen circumstances can greatly enhance your focus and readiness. By addressing these common oversights, you lay a firm foundation for a successful and enjoyable race experience.

  • Engine Swaps – Legal and Technical Considerations

    Engine Swaps – Legal and Technical Considerations

    Engine Swaps – Legal and Technical Considerations

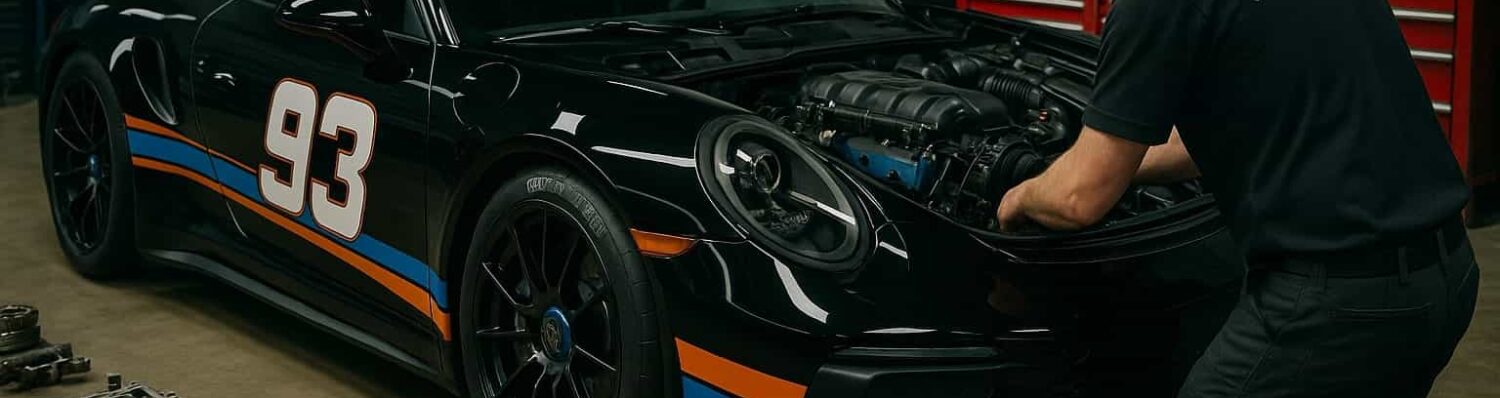
    Engine swaps have become a popular undertaking among automotive enthusiasts, offering a chance to enhance performance or restore a vehicle with modern technology. However, before embarking on such a project, it is critical to understand the legality surrounding engine swaps. Different regions may enforce various regulations that govern vehicle modifications, particularly when it comes to emissions, safety standards, and registration requirements.

    From a technical perspective, engine swaps are not merely about replacing one engine with another; they require meticulous planning and execution. Factors such as compatibility, weight distribution, and drivetrain integrity must all be taken into account to ensure that the vehicle operates safely and efficiently. It is essential to choose an appropriate engine that conforms to local laws regarding emissions and safety, ensuring that the swap is not only legally compliant but also technically sound.

    In conclusion, navigating the legal and technical aspects of engine swaps is crucial for both compliance and performance. Enthusiasts must conduct thorough research and, if necessary, consult with professionals to achieve a successful engine swap that satisfies both personal desires and regulatory requirements.

    Understanding Emission Regulations for Engine Swaps

    When considering an engine swap, it is crucial to understand the legality of the process in relation to emission regulations. Different regions have distinct laws governing how vehicle modifications, particularly engine replacements, must comply with environmental standards.

    Firstly, it’s important to identify the emissions classification of both the donor engine and the recipient vehicle. In many jurisdictions, the swap must adhere to the emissions standards that were applicable at the time the vehicle was manufactured. Therefore, if you are swapping a newer engine into an older vehicle, local regulations may require you to ensure that the emissions output does not exceed the limits set for that older model.

    Additionally, some regions require emissions testing following an engine swap to confirm that the vehicle operates within legal limits. This process often involves inspections by certified professionals who can verify compliance with both federal and state regulations. Failing to comply could result in fines, or worse, the inability to register your vehicle for road use.

    Moreover, documentation plays a significant role in establishing the legality of the swap. It’s advisable to keep records of any modifications, including receipts and certificates of compliance regarding emissions. These documents can prove invaluable if you face challenges during inspections or legal scrutiny.

    In some cases, exemptions may apply. For instance, vehicles registered as antique or classic might have different emissions requirements, allowing for a wider range of acceptable engine swaps. However, each jurisdiction has its specifications, and it’s essential to be familiar with local laws.

    Ultimately, understanding emission regulations is a vital component of planning an engine swap. Engaging with local automotive authorities or consulting emissions specialists can provide clarity and help ensure your swap remains legal and compliant.

    Navigating State-Specific Vehicle Modification Laws

    Navigating State-Specific Vehicle Modification Laws

    When considering an engine swap, it’s crucial to understand the legality surrounding vehicle modifications, as these regulations can vary significantly from state to state. Each jurisdiction imposes its own set of laws governing what modifications can be made, which directly impacts vehicle ownership and operation. Before proceeding with a swap, it’s essential to research your specific state’s vehicle modification laws to ensure compliance.

    Many states have stringent emissions standards that require vehicles to meet specific criteria, particularly if the swap involves replacing the original engine with a different make or model. This aspect is particularly important for those considering swaps that might utilize high-performance or non-compliant engines. Failing to adhere to emissions regulations can lead to fines, and in some cases, vehicles may be deemed unroadworthy.

    In addition to emissions regulations, local safety standards must also be considered. States may have different requirements regarding modifications that affect a vehicle’s safety features, such as brakes, chassis integrity, and suspension systems. Modifying these components can lead to serious safety issues and legal ramifications if the vehicle is deemed unsafe during inspections.

    Furthermore, some states require modified vehicles to undergo specific inspections or receive certifications after significant changes such as engine swaps. This process can vary from simple paperwork to extensive technical evaluations, depending on the state’s regulations. Vehicle owners should familiarize themselves with their state’s inspection requirements and ensure all modifications are documented and compliant.

    Lastly, vehicle registration processes may also be affected by an engine swap. Owners may need to update their vehicle title or registration documentation to reflect the new engine specifications. This step is essential to avoid discrepancies that could arise during future inspections or when selling the vehicle.

    In conclusion, navigating state-specific vehicle modification laws requires diligent research and compliance to ensure that any engine swap is executed legally. Understanding the interplay between legality, emissions standards, safety regulations, and registration processes will help vehicle owners make informed decisions about their modifications and avoid potential legal challenges.

    Technical Compatibility: Ensuring Proper Fit and Performance

    Technical Compatibility: Ensuring Proper Fit and Performance

    When considering an engine swap, technical compatibility plays a crucial role in ensuring both fit and performance. The first step in this process involves confirming that the new engine physically fits within the existing engine bay. Measurements of the dimensions and mounting points must align with the vehicle’s specifications. This includes verifying the distance between motor mounts, and ensuring that the oil pan, exhaust manifold, and other components do not interfere with existing structures.

    Next, one must take into account the engine’s electrical and cooling systems. Different engines may require specialized wiring harnesses and connectors for proper integration with the vehicle’s electronic control unit (ECU). Additionally, cooling requirements can vary significantly; ensuring that the radiator and coolant lines can handle the new engine’s needs is essential for maintaining optimal operating temperatures.

    Another critical aspect is drivetrain compatibility. The transmission must be suitable for the new engine’s power output, including torque specifications and gear ratios. This consideration often extends to the differential and driveshaft, which should be assessed for strength and alignment with the new performance dynamics.

    Furthermore, it’s vital to consider the potential need for modifications to the exhaust system. An engine swap can alter exhaust flow, necessitating custom headers or modified exhaust pipes to maximize performance while adhering to noise regulations and emissions standards.

    In conjunction with these technical aspects, understanding the legal implications of an engine swap is paramount. Compliance with local laws ensures that the vehicle remains roadworthy and adheres to emissions regulations. In summary, careful planning and thorough assessment of technical compatibility are essential to guarantee a successful and legal engine swap, resulting in improved performance without compromising vehicle integrity.

  • From Street to Track – Full Conversion Guide

    From Street to Track – Full Conversion Guide

    From Street to Track – Full Conversion Guide

    Transforming your everyday street car into a formidable track machine can be an exhilarating journey. The thrill of the race track awaits, but it’s essential to approach this conversion with a clear plan and thorough preparation. This guide will walk you through the critical steps needed to prep your vehicle for high-performance driving, ensuring safety and maximizing your potential on the track.

    Before diving into the modifications, it’s vital to understand the inherent differences between a standard street car and a track-ready vehicle. A track car must not only enhance speed and handling but also accommodate the rigors of competitive driving. This involves meticulous attention to detail, from upgrading suspension components to improving safety features. In the following sections, we will cover everything you need to consider while prepping your street car for the track, helping you transition from a casual driver to a serious contender.

    From essential modifications like tires and brakes to finer adjustments such as weight reduction and aerodynamics, this comprehensive guide will equip you with the knowledge necessary to make informed decisions. Whether you’re a seasoned racer or a newcomer excited about track days, understanding how to effectively convert your street car will enhance your driving experience and performance on the circuit.

    Choosing the Right Modifications for Performance Enhancement

    Transforming your street car into a capable track machine requires careful consideration of various modifications that can significantly enhance performance. The right upgrades can improve handling, acceleration, and overall responsiveness, allowing you to make the most of your time on the track.

    Start with suspension upgrades. Upgrading your suspension system is crucial for enhancing handling capabilities. Consider installing or performance shocks that allow for adjustability and improved dampening. Stiffer springs and sway bars can minimize body roll during cornering, providing a more stable driving experience.

    The next primary area of focus should be the braking system. Track driving demands high-performance brakes to withstand intense heat and provide consistent stopping power. Upgrade to performance brake pads, rotors, and stainless steel brake lines. These enhancements will ensure better heat dissipation and reduce fade during extended sessions on the track.

    Engine modifications are also essential for boosting power output. Start with a cold air intake and a high-performance exhaust system. These changes can improve airflow, resulting in better combustion and increased horsepower. Additionally, consider re-tuning your engine management system to maximize the benefits of these upgrades and ensure optimal performance.

    Don’t overlook the importance of tires. Upgrading to performance-oriented tires designed for track use can dramatically improve grip and handling. Look for tires with a softer compound and a tread pattern optimized for dry conditions. This will enhance your car’s cornering abilities and provide better traction during acceleration.

    Finally, consider weight reduction strategies, such as removing unnecessary components or replacing heavy parts with lightweight alternatives. Every bit of weight saved can translate to improved acceleration and braking performance, making your street car more competitive on the track.

    By carefully choosing the right modifications focusing on suspension, braking, engine performance, tires, and weight reduction, you can ensure your street car transitions into a formidable track vehicle, ready for any challenge the circuit presents.

    Essential Safety Upgrades for Track Readiness

    Essential Safety Upgrades for Track Readiness

    Preparing your car for the track goes beyond performance enhancements; safety upgrades are crucial to ensure both driver and vehicle are protected during high-speed runs. Here are essential upgrades to consider:

    1. Roll Cage Installation

    A roll cage is one of the most critical additions to enhance structural integrity. It protects the driver in case of a rollover or collision. Ensure the roll cage meets regulations set by your track and is professionally installed to guarantee maximum safety.

    2. Harness System

    Replacing your factory seat belts with a multi-point harness system significantly improves safety. A five-point or six-point harness keeps you securely in place during sharp turns and acceleration, reducing the risk of injury during high-stress situations on the track.

    3. Racing Seats

    Investing in a dedicated racing seat can significantly enhance your driving stability. These seats are designed to work with harness systems and provide better support, keeping you secure while driving at high speeds.

    4. Fire Suppression System

    In the unfortunate event of an engine fire, a fire suppression system can be a lifesaver. These systems activate quickly and can extinguish flames before they become uncontrollable, providing an essential layer of safety while on track.

    5. Improved Braking System

    A high-performance braking system is vital for track use. Upgrading to larger rotors, high-friction brake pads, and stainless steel brake lines will improve stopping power and reduce brake fade, ensuring you can handle tight corners and high-speed straights safely.

    6. Tire Selection

    Choosing the right tires is crucial for track prep. Opt for dedicated track tires that provide better grip and handling. Ensure they have the correct pressure for optimal performance and safety on race day.

    7. Safety Gear

    Don’t forget about personal safety gear. A proper helmet certified for racing, gloves, racing shoes, and a fire-resistant suit are essential for any track session. Ensuring you wear the right gear can minimize injuries in the event of an accident.

    8. Fluid Extraction and Replacement

    Fluids play a crucial role in track performance. Ensure to replace old oil, coolant, and brake fluid with high-quality racing fluids to prevent overheating and maintain optimal performance. Regular checks before heading to the track are essential.

    By implementing these safety upgrades, you can enhance your vehicle’s readiness for the track and significantly reduce the risks associated with high-speed driving. Prioritizing safety is paramount for an enjoyable and successful track experience.

    Preparing Your Car for Track Day: Final Checks and Adjustments

    Preparing Your Car for Track Day: Final Checks and Adjustments

    Before hitting the track, it’s essential to perform a thorough prep to ensure your street car is ready for the demands of racing. Begin with a detailed inspection of your vehicle’s fluids. Check the engine oil, coolant, brake fluid, and transmission fluid levels. Top off or replace any fluids that don’t meet the required standards, as maintaining optimal levels can prevent overheating and mechanical failure during the day.

    Next, focus on your tires. Inspect them for proper tread depth and uniform wear. Ensure that the tire pressure matches the specifications recommended for track use, as this can significantly impact grip and handling. If your street tires aren’t suitable for the conditions, consider investing in a set of performance tires designed for track use.

    Brake system performance is paramount on the track. Examine the brake pads for wear and ensure they have sufficient material left. Check the rotors for any signs of warping or excessive wear. Consider upgrading to high-performance brake pads and possibly vented rotors to enhance stopping power and heat dissipation during track sessions.

    Review your suspension components. Look for any signs of damage or wear in the shocks, struts, and bushings. Adjust the suspension settings to improve handling and stability. If your modifications include aftermarket upgrades, ensure everything is tightened to manufacturer specifications to prevent any issues while driving.

    Don’t forget to secure all essential items inside your car. Remove excess weight by taking out unnecessary items from the trunk and cabin. Ensure that the battery is securely fastened and that there are no loose objects that could become projectiles during spirited driving.

    Lastly, conduct a systems check to verify that all lights, signals, and instruments are functioning correctly. This ensures you have accurate information while on the track, which is crucial for safety and performance evaluation.